FRaming – Product Variants – Options , Pricing Setup
Artworks , Framing – Product Options / Variants , Pricing Setup Use Cases Flow
- Simplest Use Cases Flow – Platform alone
- Medium Use Cases Flow – Both Platform & LIVEARf App
- Complex Use Cases Flow – Only in LIVEARf App
1. Simplest Platform Use Cases Flow
Merchant Requirements :
- The merchant requires a maximum of 3 options such as size, color, material, or style, along with pricing configuration.
- The display of options should be limited to a rectangular button only.
- The merchant also requires the utilization of LIVEARf features for preview purposes.
Shopify Standard Pricing :
Follow these steps to configure Shopify Standard Pricing
- In the product details page, scroll down to the “Variants” section.
- Identify the option you want to base your pricing on, such as size, color, material, or style.
- Click on the option (e.g., “Size“) to expand it and reveal the available values (e.g.,8″x10″, 10″x12″, 11″x13”).
- Enter the corresponding details for each value. For example, specify the SKU, barcode, and inventory quantity for each size variant.
- Set the price for each variant by entering the respective prices in the designated field. For instance, enter $10 for 8″x10″, $15 for 10″x12″, and $20 for 11″x13″.
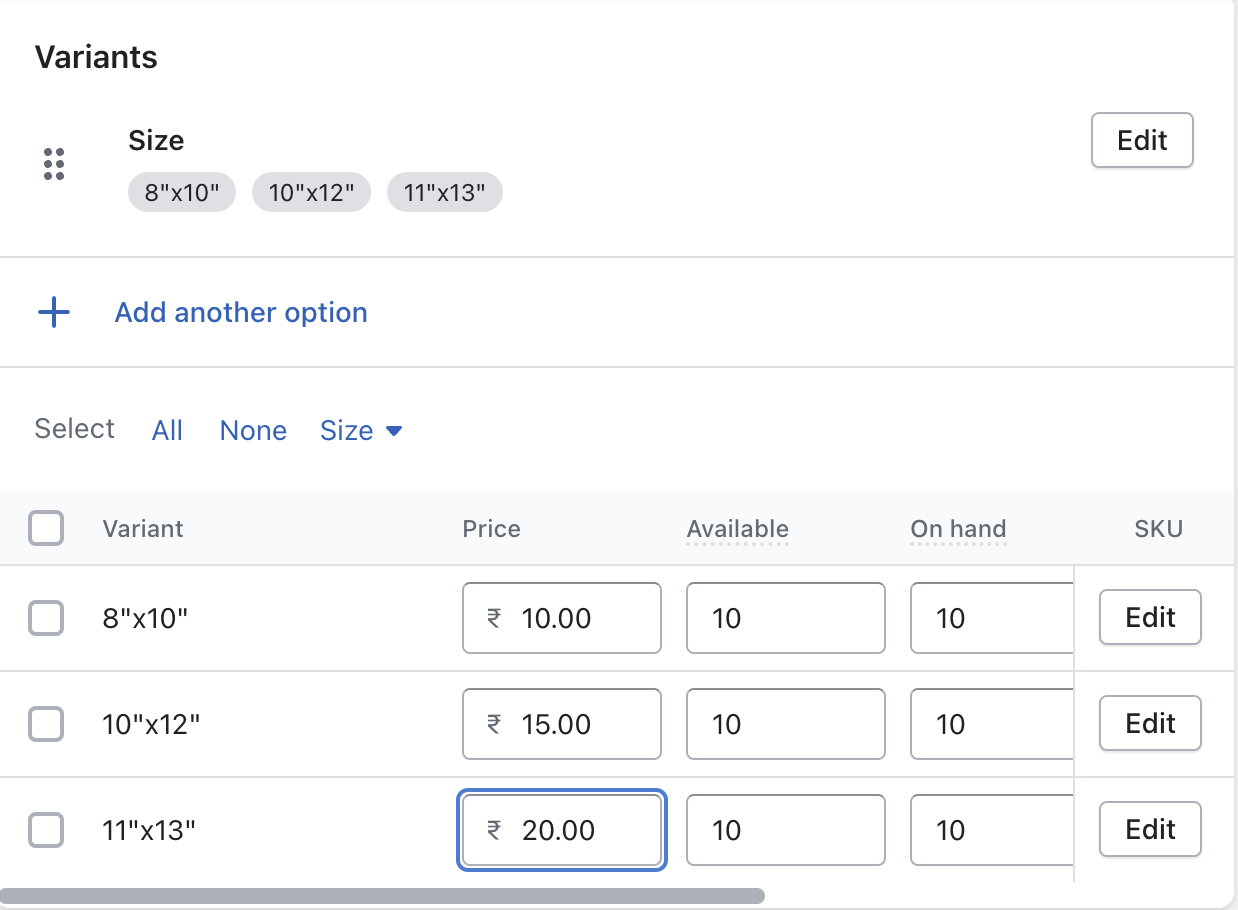
- Repeat steps 1-5 for other options, such as color, material, or style, if applicable to your product.
- Once you have finished setting up the pricing and options, click the “Save” button to save the changes.
- Test the pricing configuration by previewing the product on your Shopify store. Verify that the correct prices are displayed based on the selected options.
Preview :

Our customers who are using these “simplest platform use case flow“:
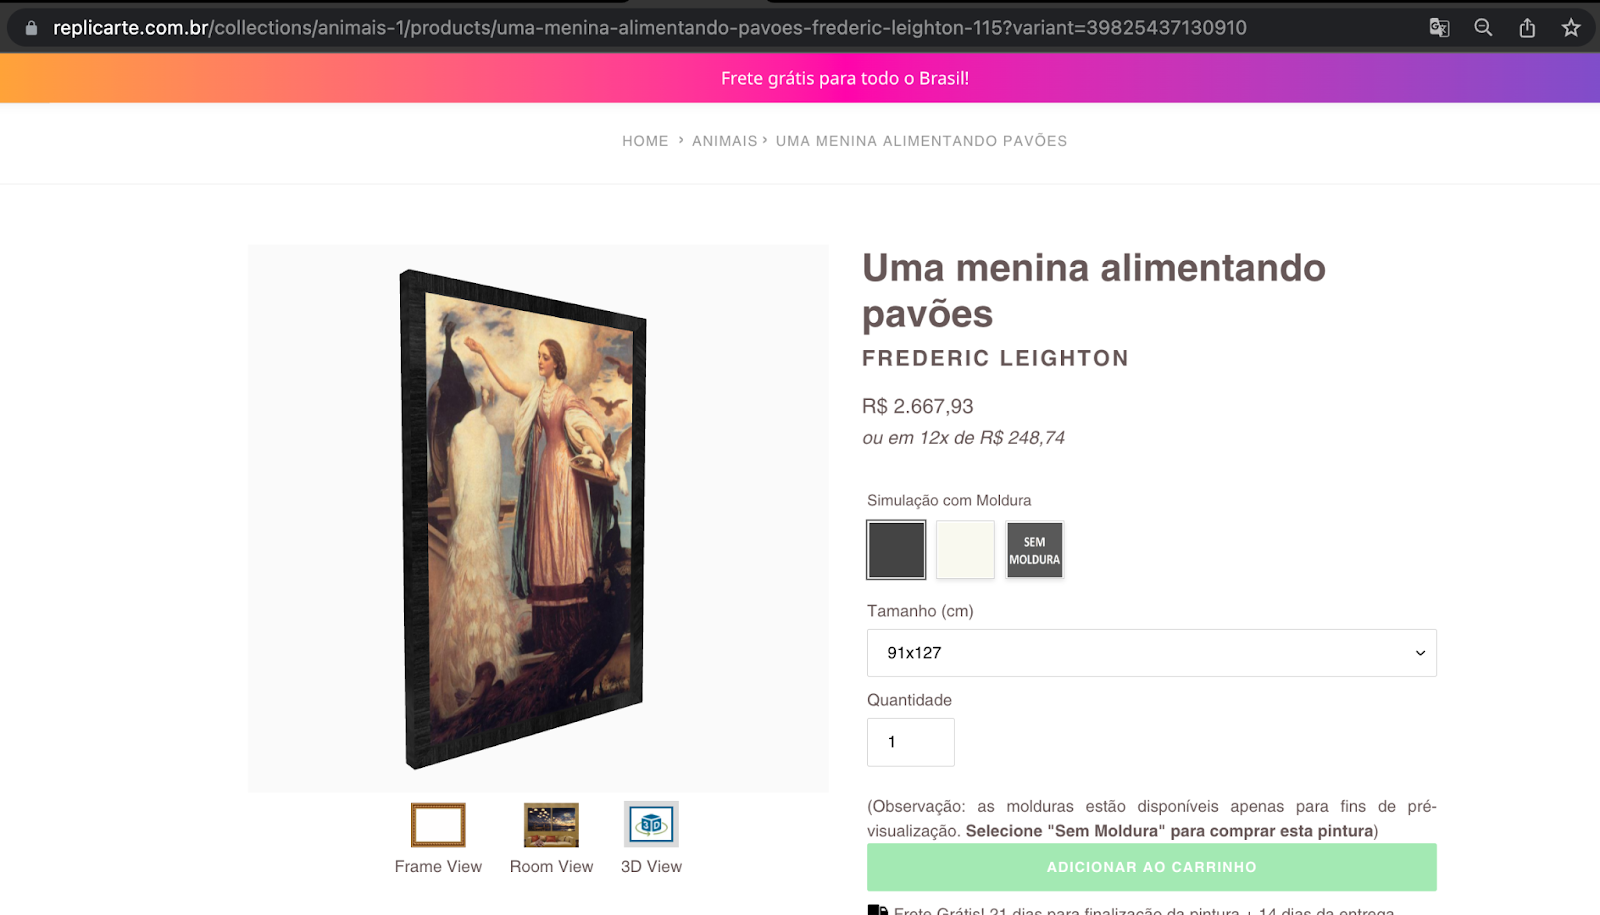
These Customers configure prices based on their product sizes. Additionally, they take advantage of our LIVEARf features, including frame styles, room view, and 3D view, for preview purposes only.
2. Medium Complex Use Cases Flow
– Hybrid (In Shopify as well as in LIVEARf App)
Merchant Requirements :
- Requiring only 3 options, but they need a LIVEARf framing option, such as frame style/frame color with pricing configuration.
- Requiring more than 3 options with pricing configuration.
- Requiring Swatch option (for frame finishes or colors), ImageUpload, DropDown, Text Field, Radio Button to show their features along with pricing configuration.
- Requiring pricing configuration for LIVEARf framing options, such as frame style and mat, based on the size combinations.
LIVEARf Predefined Pricing Configuration :
Steps for LIVEARf Predefined Pricing Configurations (For LIVEARf Framing Options Price Based on Size Combinations):
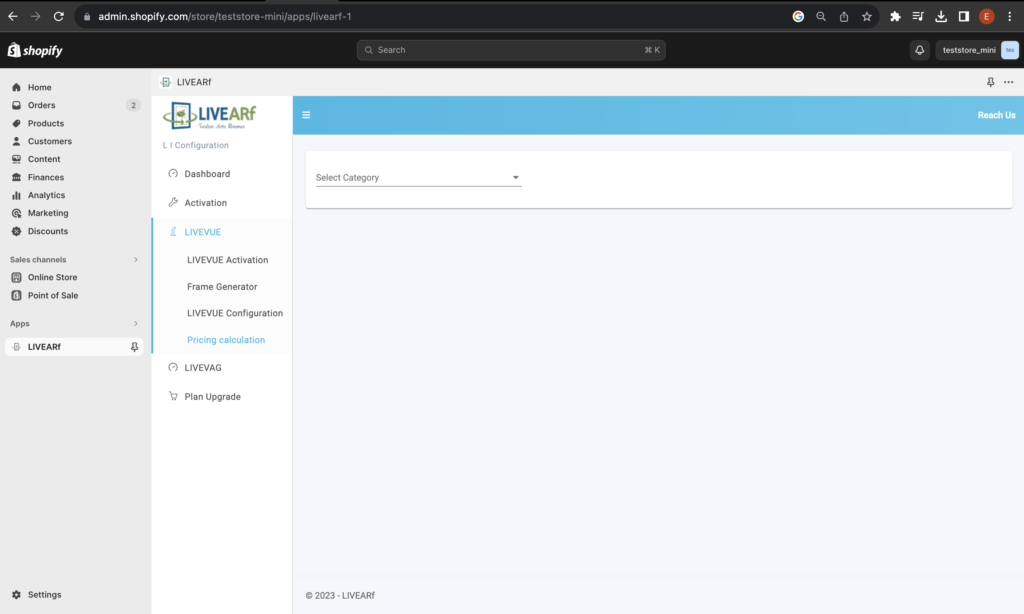
STEP 1: Go to the LIVEARF App.

STEP 2:
- Click on the LIVEVUE link at the left side
- Click on the LIVEVUE configuration link within it.
- In Preview Enable, check mark the category for which the pricing is being modified. Enable the right side options which one you prefer.

STEP 3:
- Once the LIVEVUE configuration is complete, Click on the “Pricing calculation” link on the left side

- In the “Pricing Calculation” section, locate the “Select category” dropdown box.
- From the dropdown, choose the desired category for which you want to configure pricing calculations.
- Once a category is selected, the displayed sizes are specific to the collection and are not determined at the merchant level. All product sizes within the chosen category will be shown.
- If you’ve recently added new sizes and they are not yet displayed, you can ensure their availability by using the “Sync All Size” button. Click this button to synchronize the new sizes with the pricing calculation configuration.
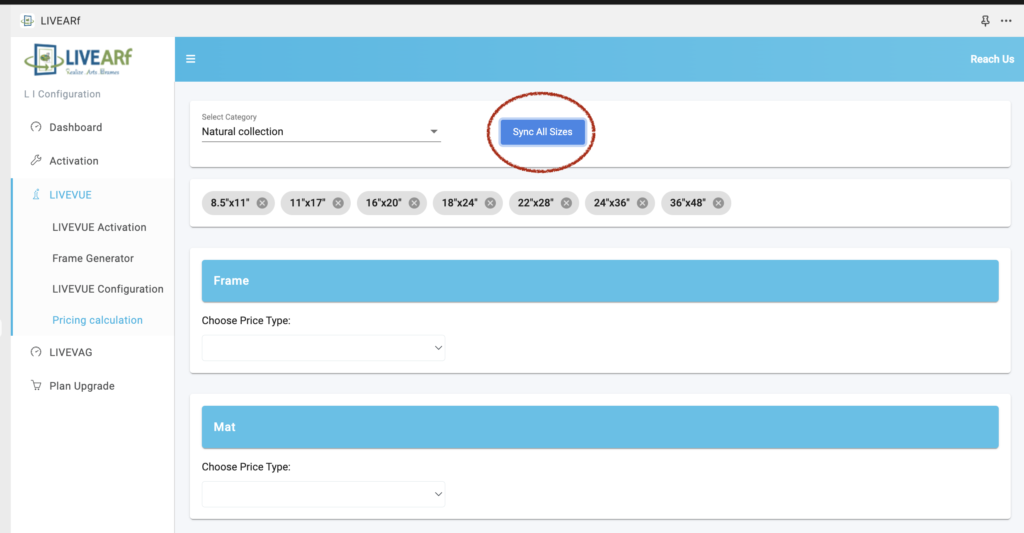
- Under the Choose Price Type, Choose the “Pre-defined” option from the available choices. This option allows you to configure pricing based on predefined settings from the LIVEVUE Configuration.
- The options that you’ve previously created in the LIVEVUE Configuration will now be listed alongside their respective size combinations.
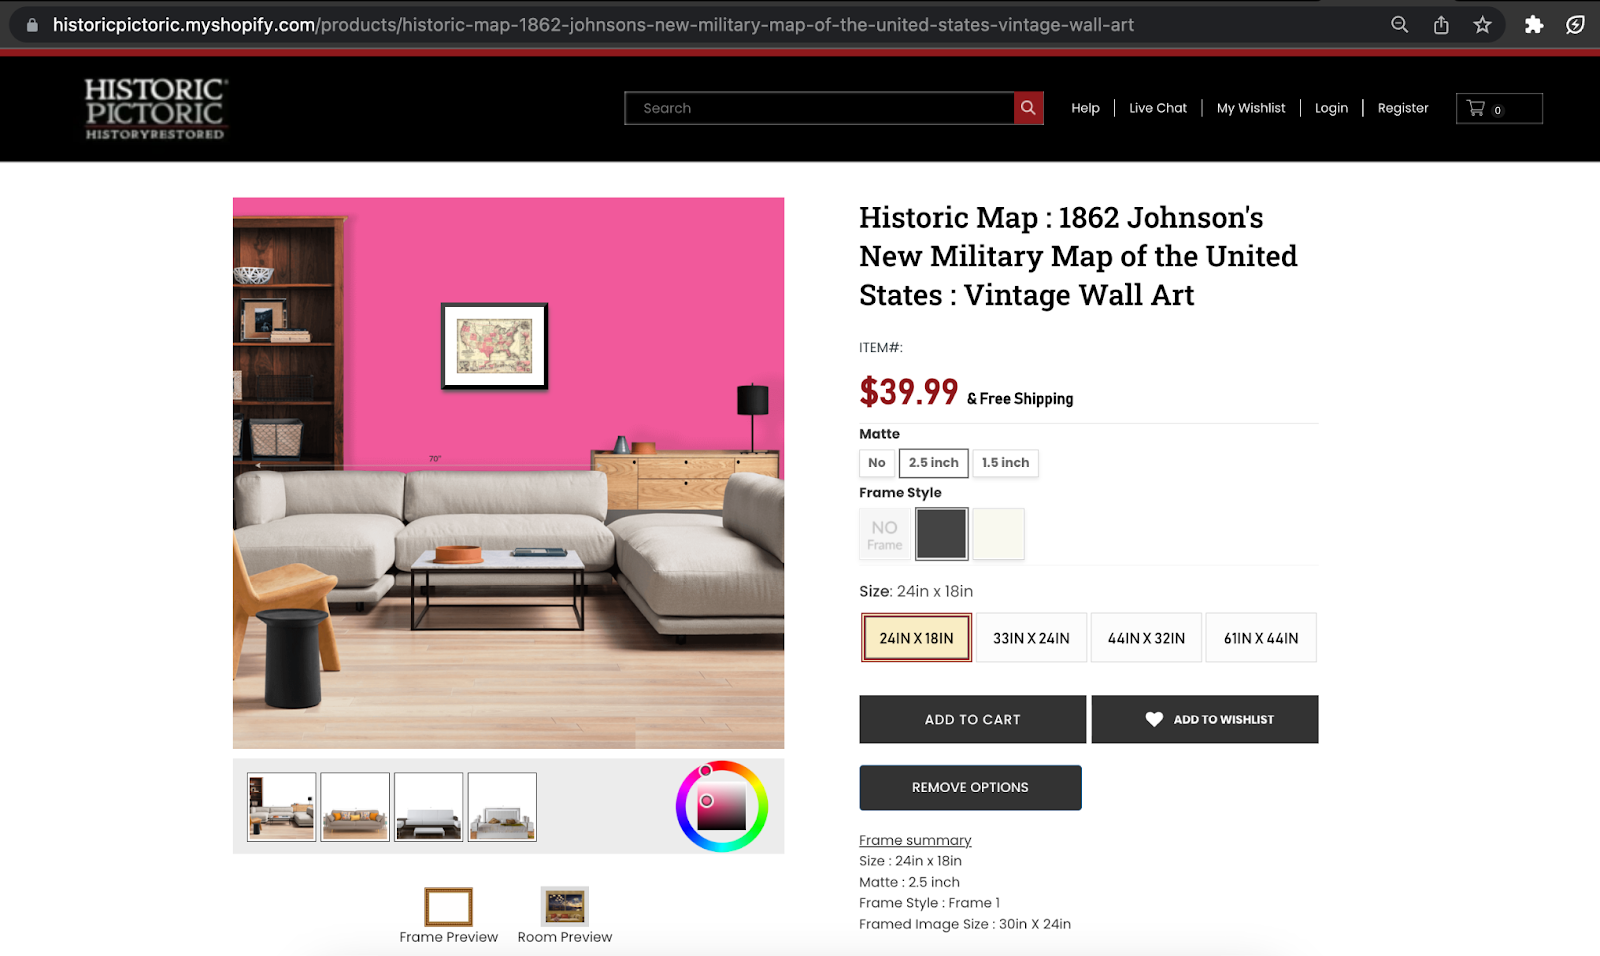
- Mat with size combination table will be shown at the bottom.
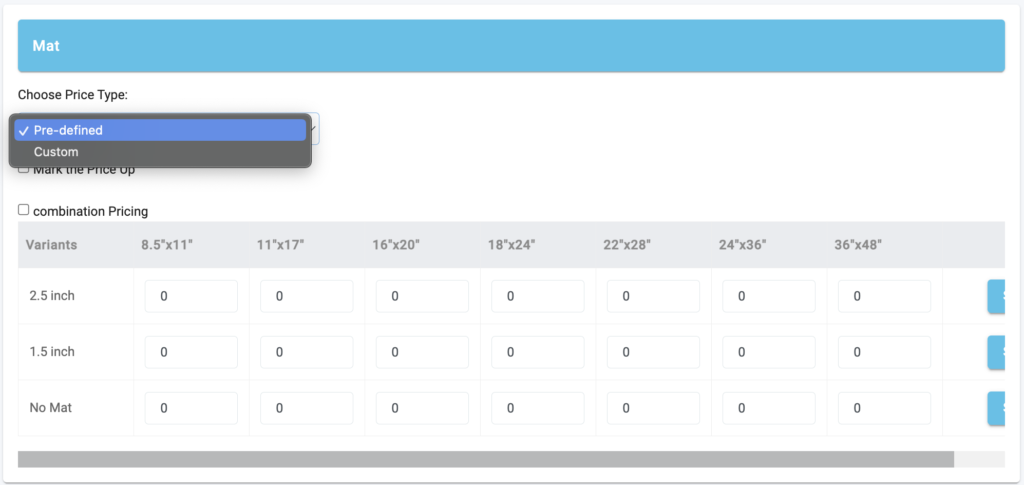
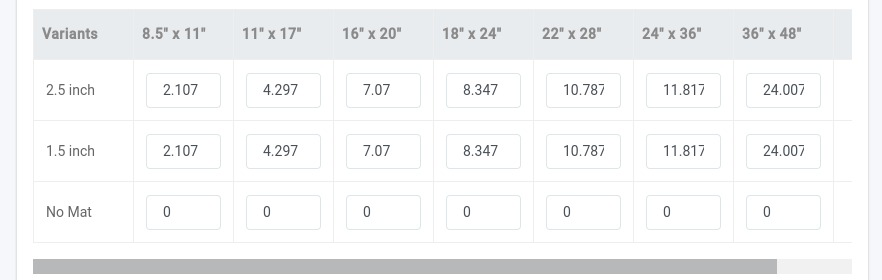
- Enter the Prices for mats of particular size.

- Click the “Save” button on the right side. Tick marks will be shown once it is saved.
- Preview the website and note the price for the 11″x17″ size variant, which is $55.86 configured in Shopify.
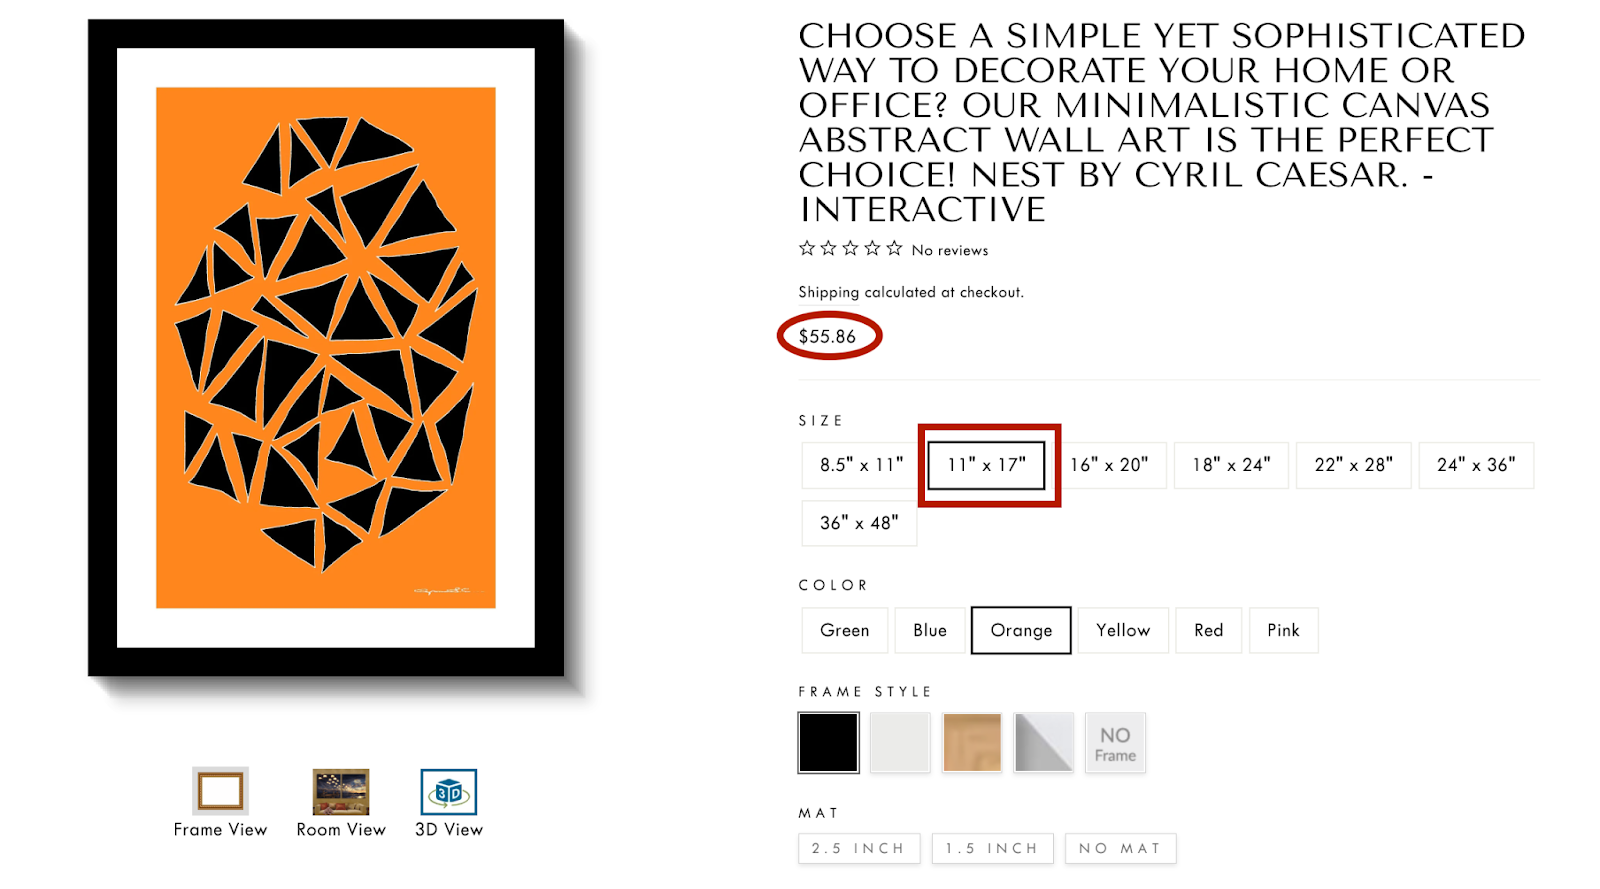
- Select the mat option with a 2.5-inch, which has a price value of $4.297 configured in the Livearf app.
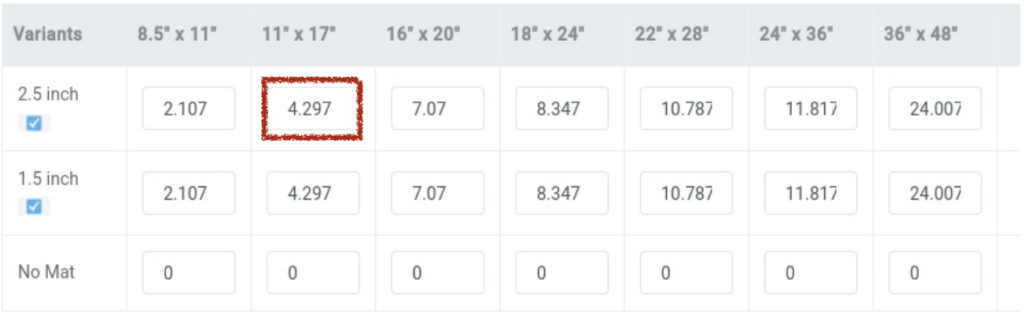
- Now Preview the website
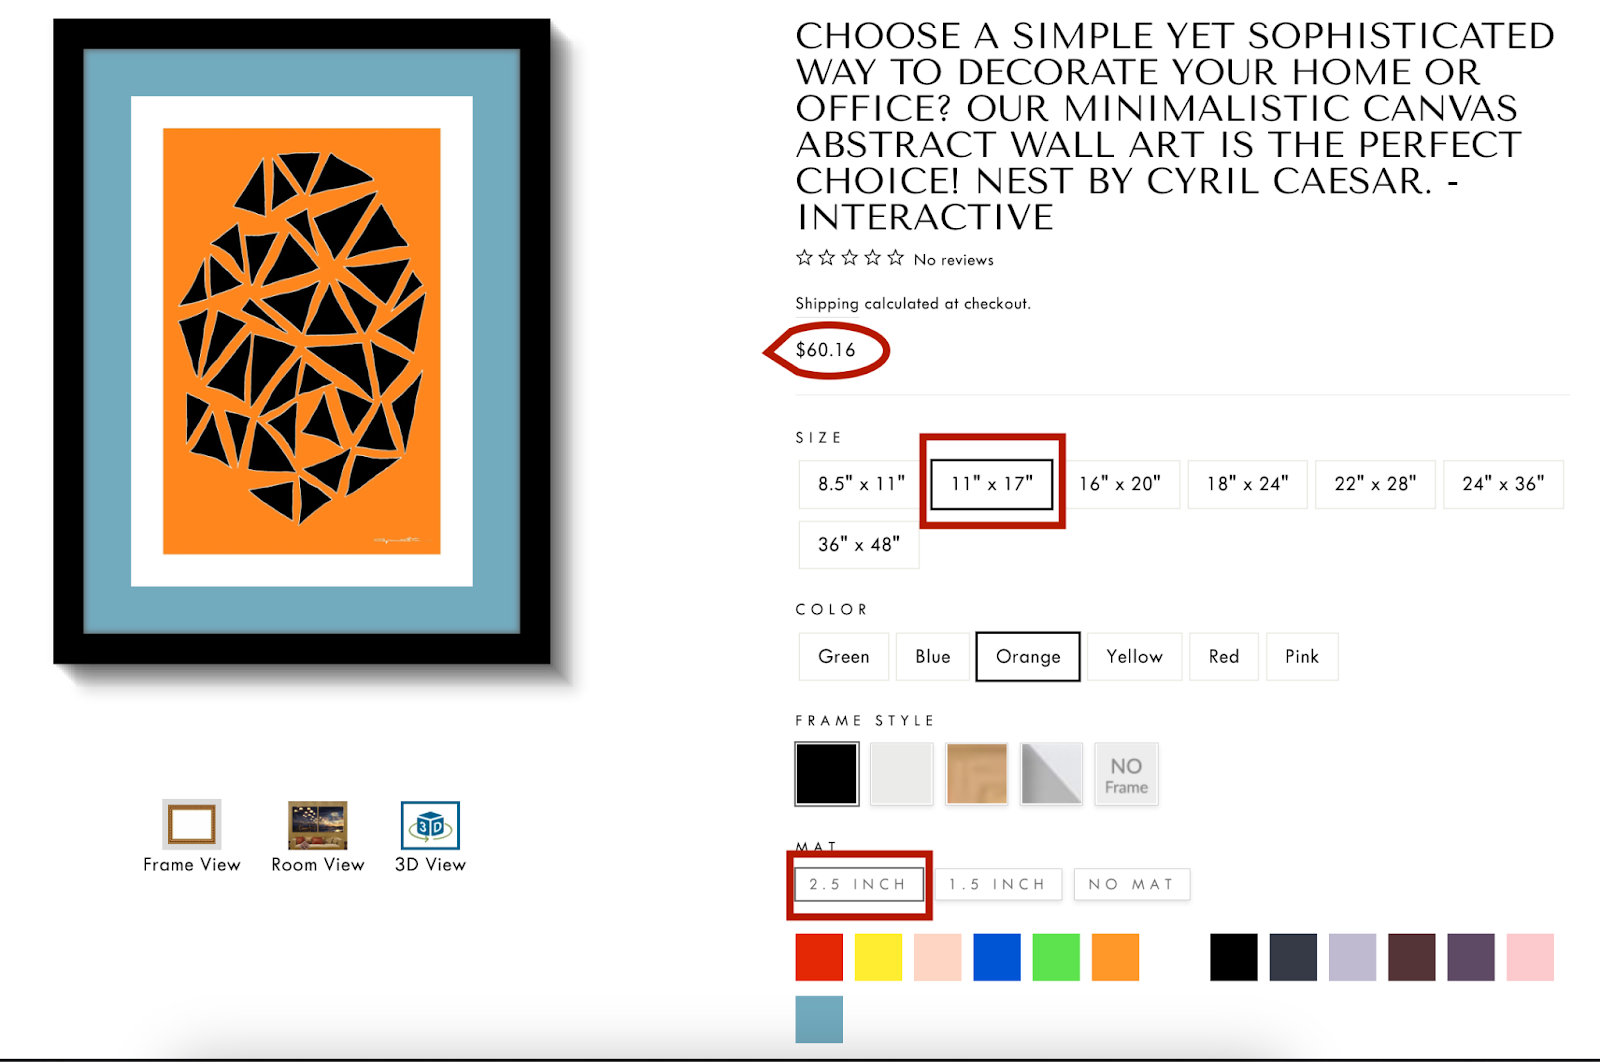
- Total price by adding the size variant price ($55.86) and the mat price ($4.297): $55.86 + $4.297 = $60.157. $60.16 is displayed on the website.
One of our customers using these type of “Hybrid (Platform, App)“: MIAMIABSTRACT

LIVEARf Framing Styles / Options alone Configuration:
Steps of LIVEARf Framing Option instead of simple text:
- Create options such as material, size, and frame style with its pricing in Shopify.
- After creating the options, the website will display them with its options pricing.
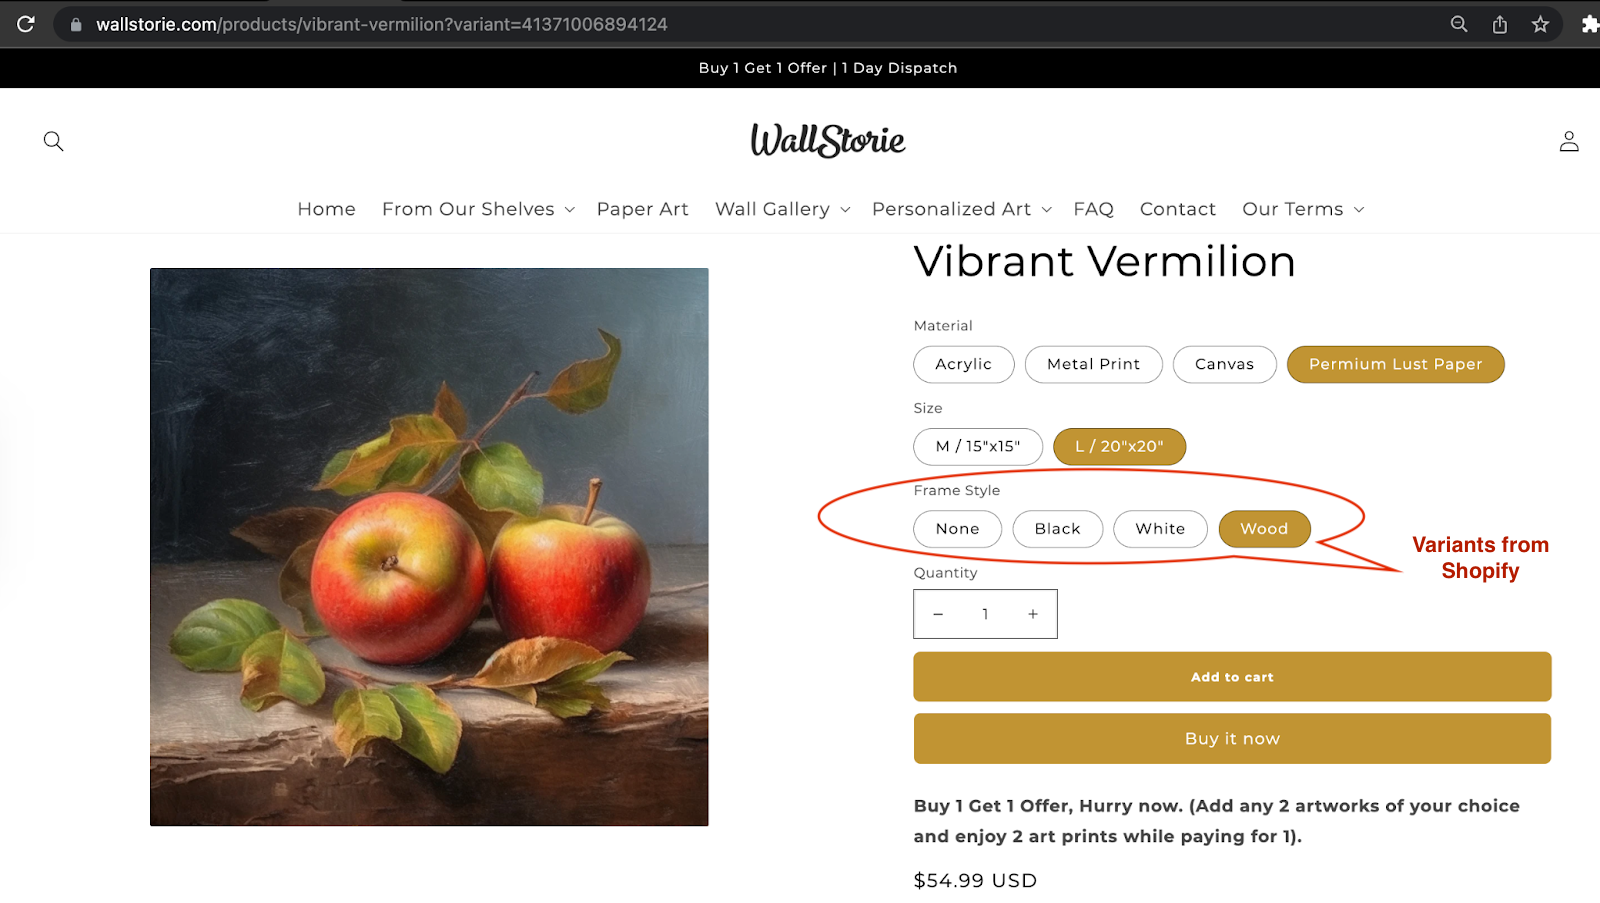
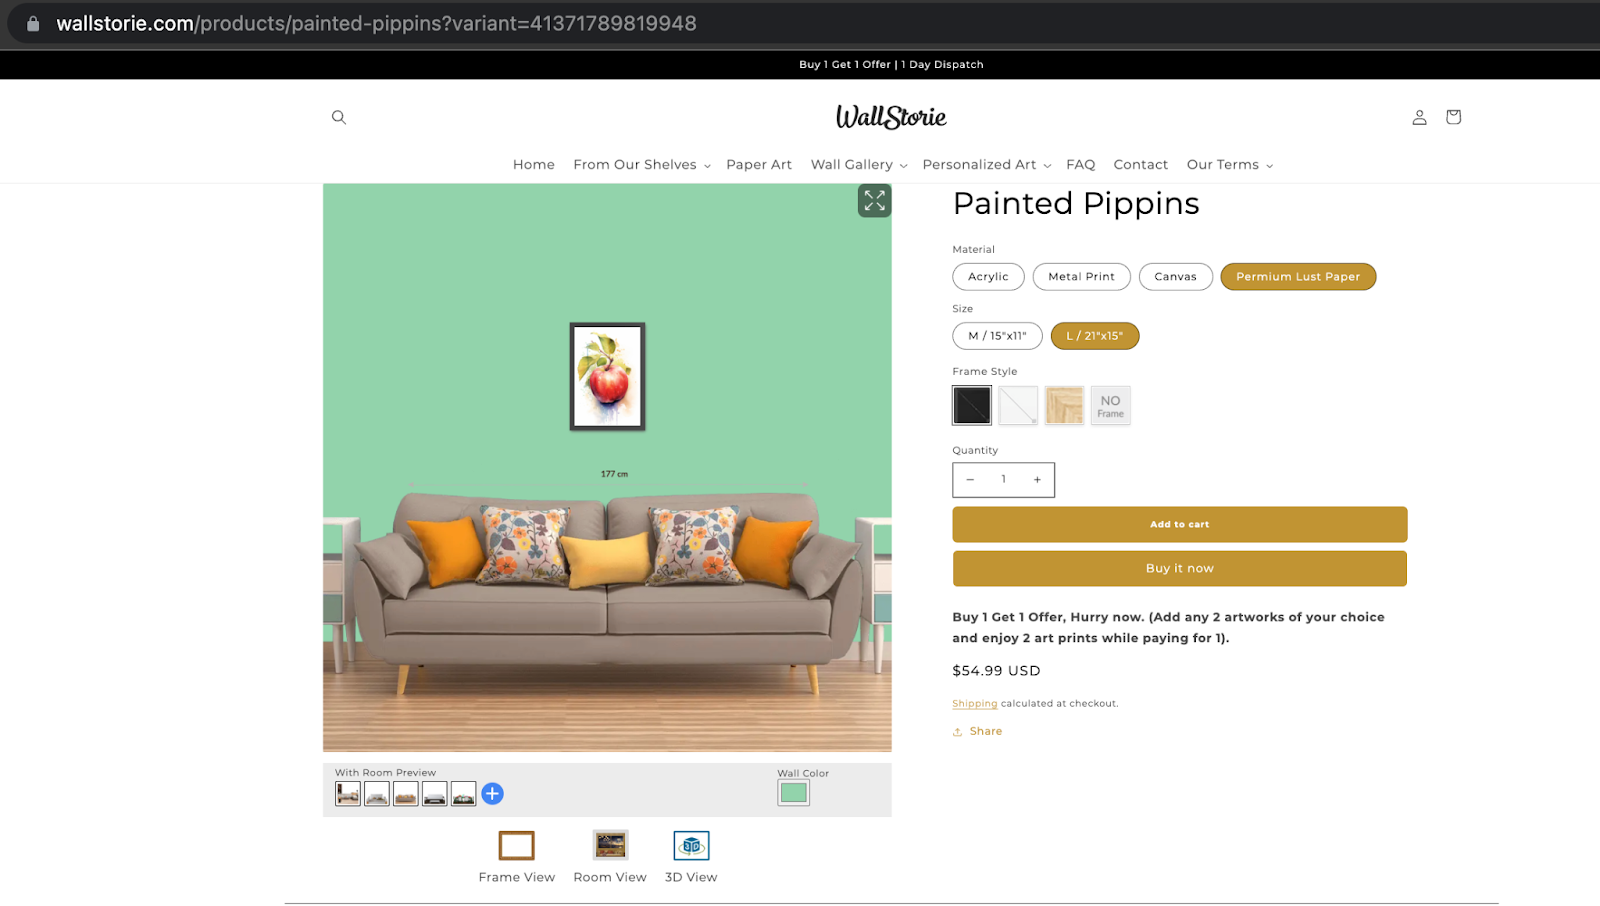
- If you prefer the LIVEARF framing style with framing preview instead of simple text, we will replace the Shopify variant options with LIVEARF options.
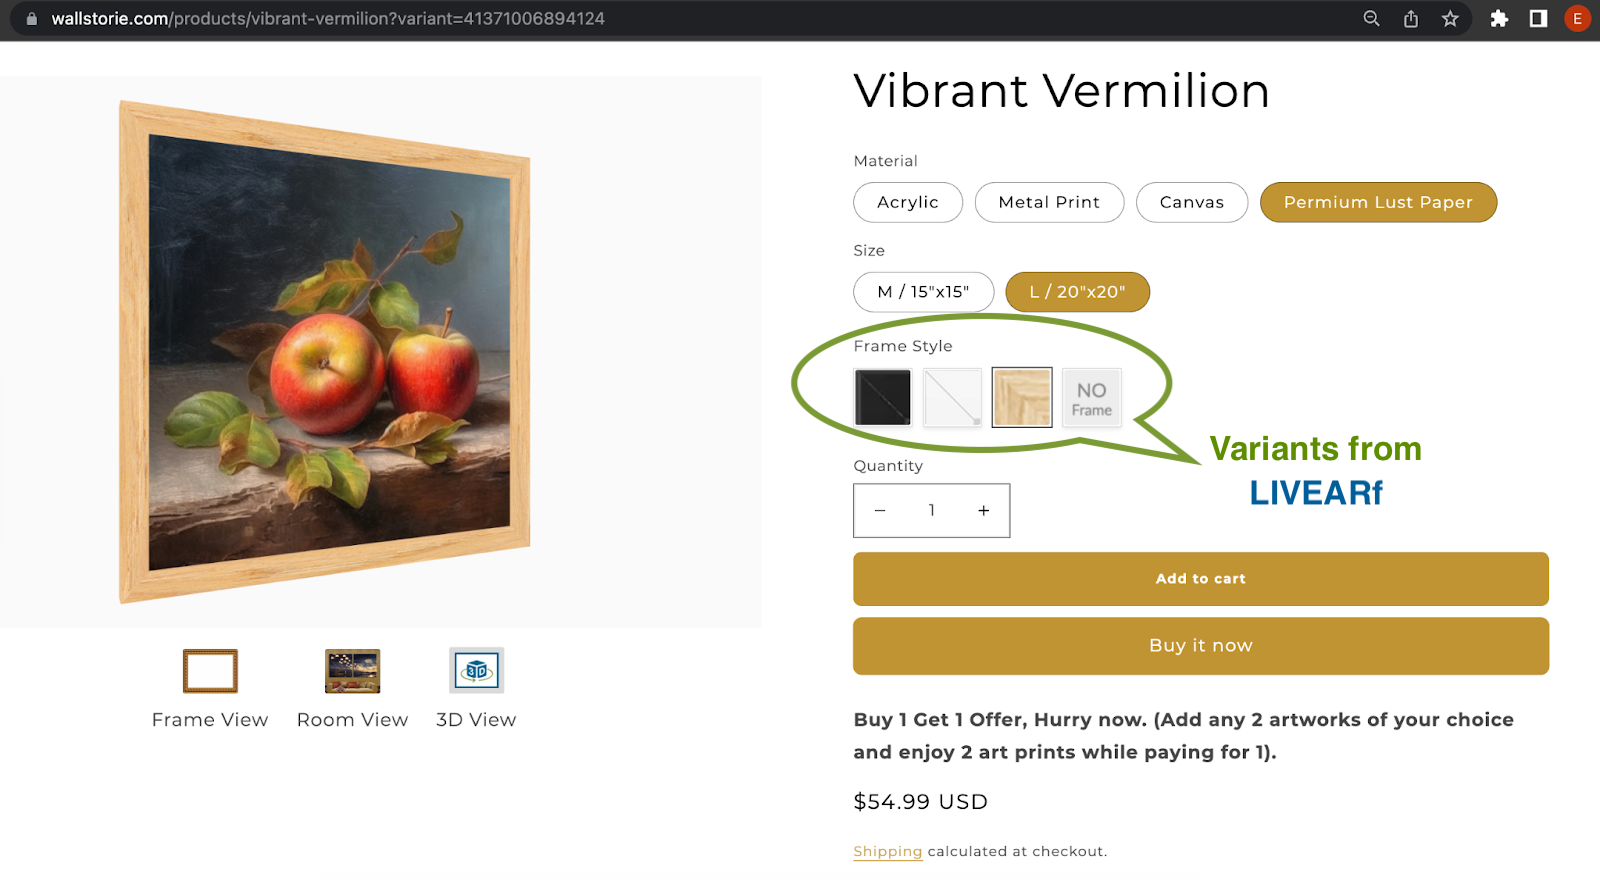
- Only the LIVEARF framing style is overridden, but the price for that frame style will still come from the initial configuration you set up in Shopify.
One of our customers uses this type of “Hybrid (Platform, App)“: WallStorie.
3. Complex Use Cases Flow
Merchant Requirements :
- The merchant requires more than 3 options such as size, color, material, or style, along with pricing configuration.
- The merchant requires support for custom formulas for variant options and a wide range of calculations.
LIVEARf Complex Pricing Setup:
LIVARf team highly recommends to keep the complex pricing / formulae calculations in a MSFT Excel , Google Spreadsheet
Steps for adding variants, options, and its pricing in the LIVEARf app:
STEP 1: Go to the LIVEARF App.
STEP 2:
- Click on the LIVEVUE link at the left side
- Click on the LIVEVUE configuration link within it.
- In Preview Enable, tick marks the category for which the pricing is being modified. Enable the right side options which one you prefer.
Add variants in the LIVEVUE Configuration section:
You can present your framing feature options using these selection controllers such as Rectangle – Buttons, DropDown, Text, and Radiobutton.
Rectangular Button option:
- Go to the LIVEVUE Configuration section, click on the “Rectangle” option.

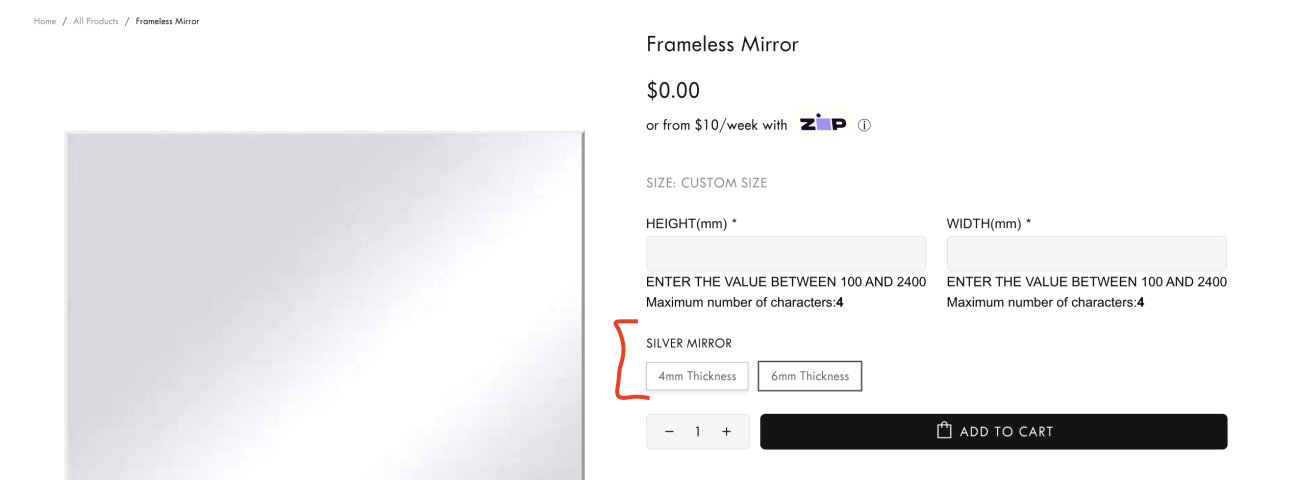
- In the Option Name field, enter “SILVER MIRROR” as the name for the variant.
- In the “Enter label” text box, enter “4mm Thickness” to specify the thickness of the silver mirror variant.
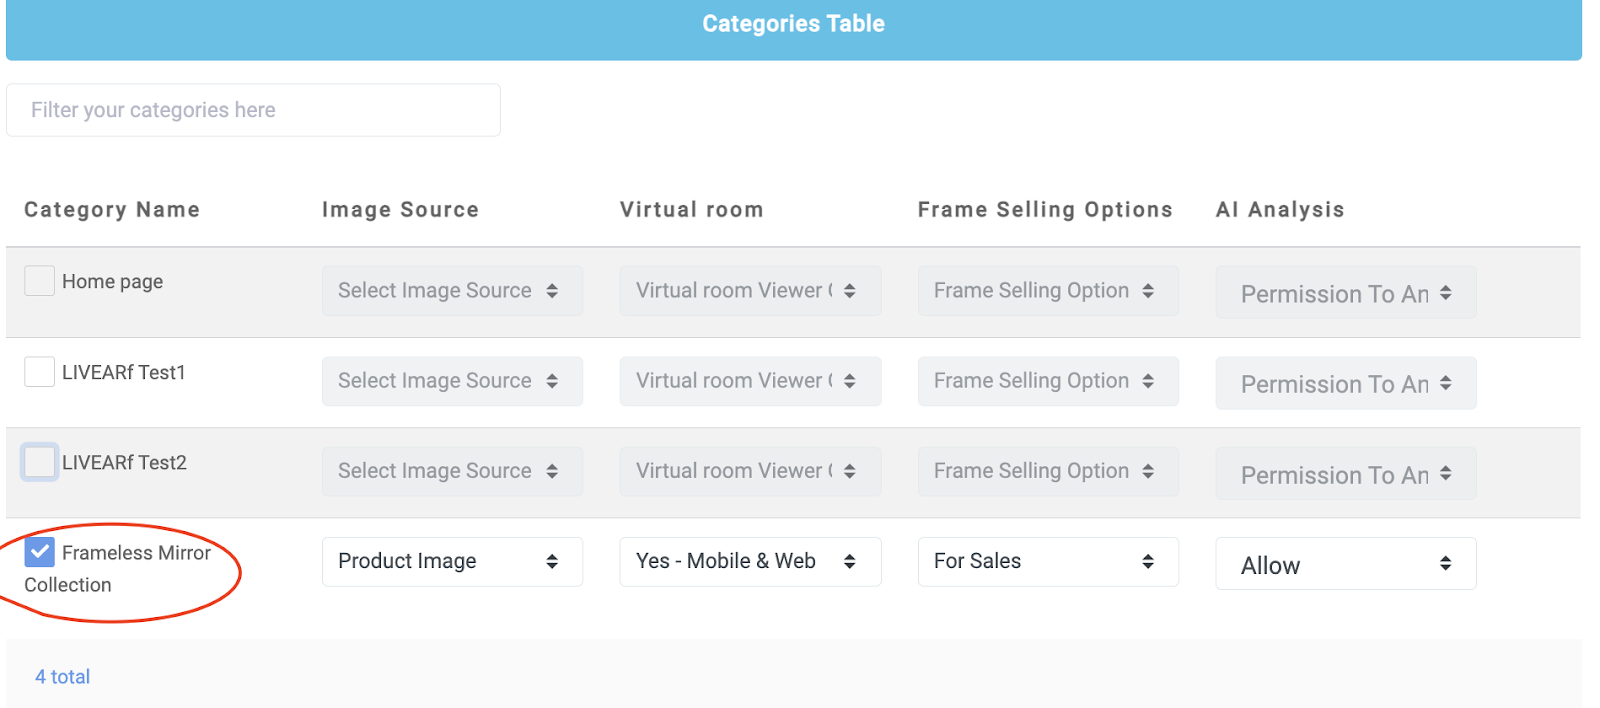
- In the “Select collection” dropdown box, choose “Frameless Mirror Collection” as the category for this variant.
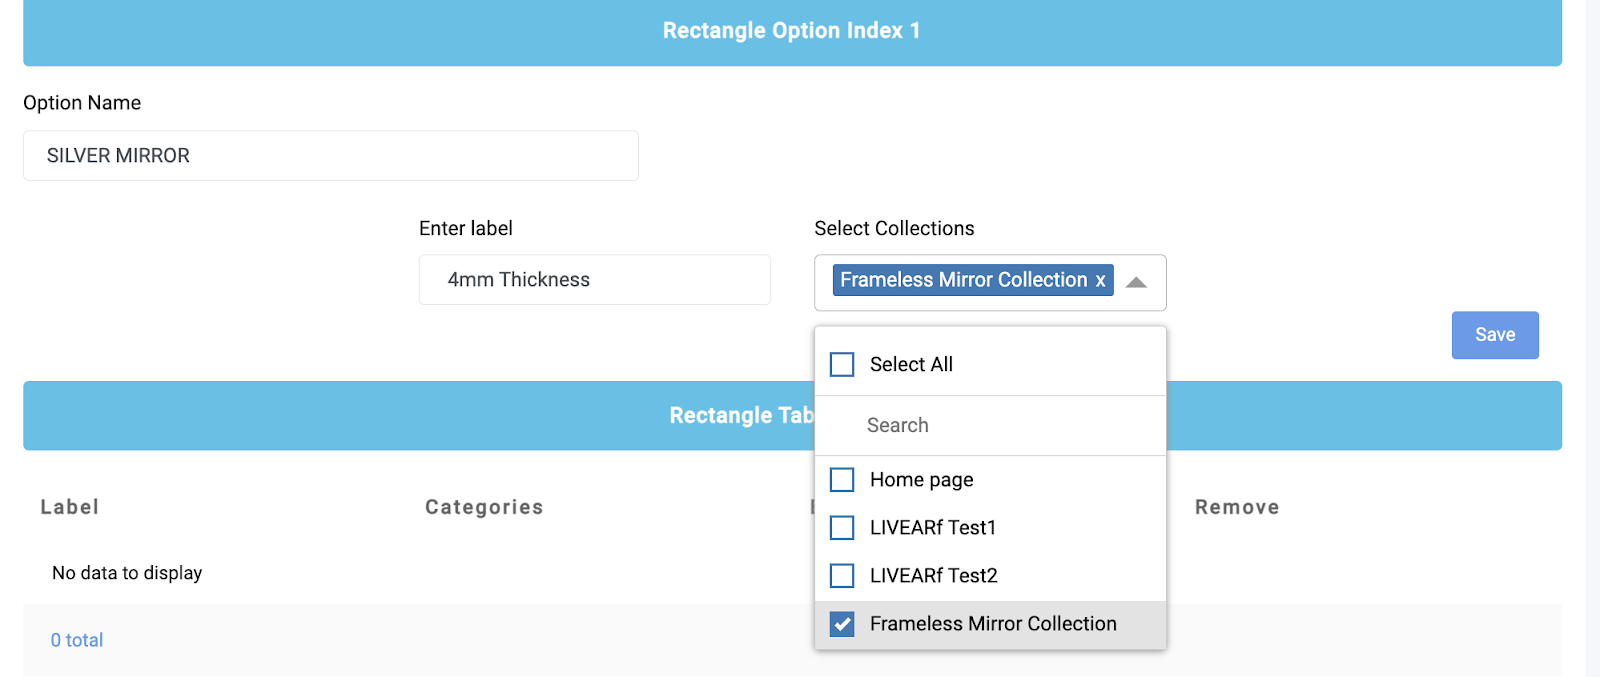
- Click the “Save” button.

- After saving, the entered option will be listed below. If you need to make any changes to the variant, you can edit it by clicking on the respective Edit option.
- To add another label, enter “6mm Thickness” in the “Enter label” text box.

- Choose “Frameless Mirror Collection” as the category for the variant.
- Click the “Save” button.
- Check the entry below to ensure that both variants (4mm Thickness and 6mm Thickness) are listed correctly.

- You can preview it on a website.
Radio button option:
- Go to the LIVEVUE Configuration section, click on the “Radio Button” option.
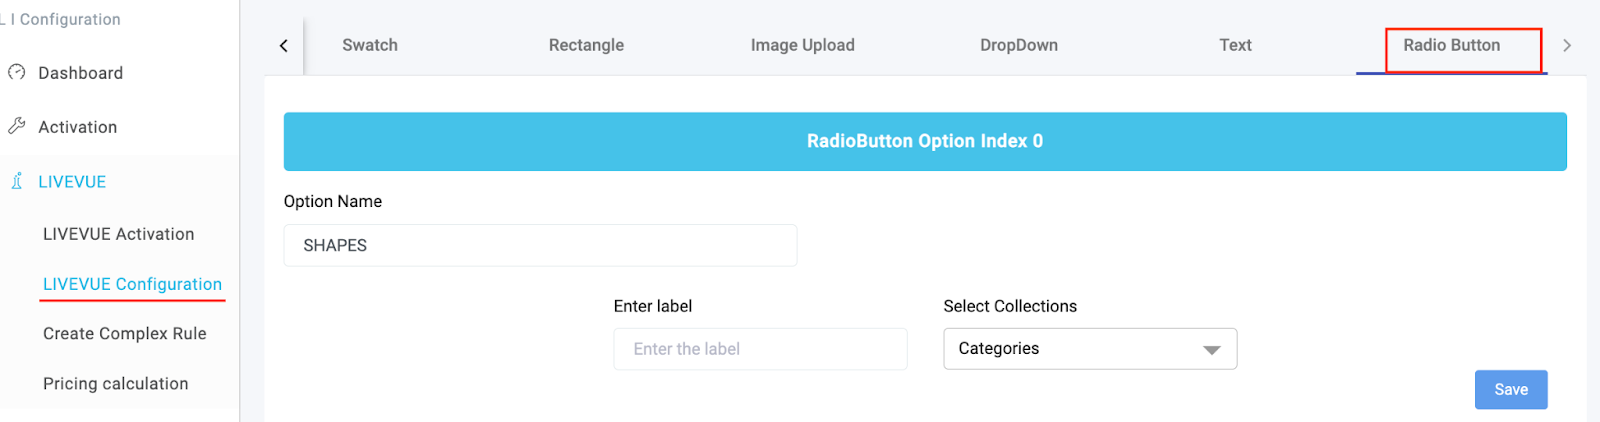
- In the Option Name field, enter “SHAPES” as the name for the variant.
- In the “Enter label” text box, enter “Rectangular” to specify the shape of the variant.
- In the “Select collection” dropdown box, choose “Frameless Mirror Collection” as the category for this variant.

- Click the “Save” button.
- After saving, the entered option will be listed below. If you need to make any changes to the variant, you can edit it by clicking on the respective Edit option.

- To add another label, enter “Circular” in the “Enter label” text box.
- Choose “Frameless Mirror Collection” as the category for the variant.
- Click the “Save” button.
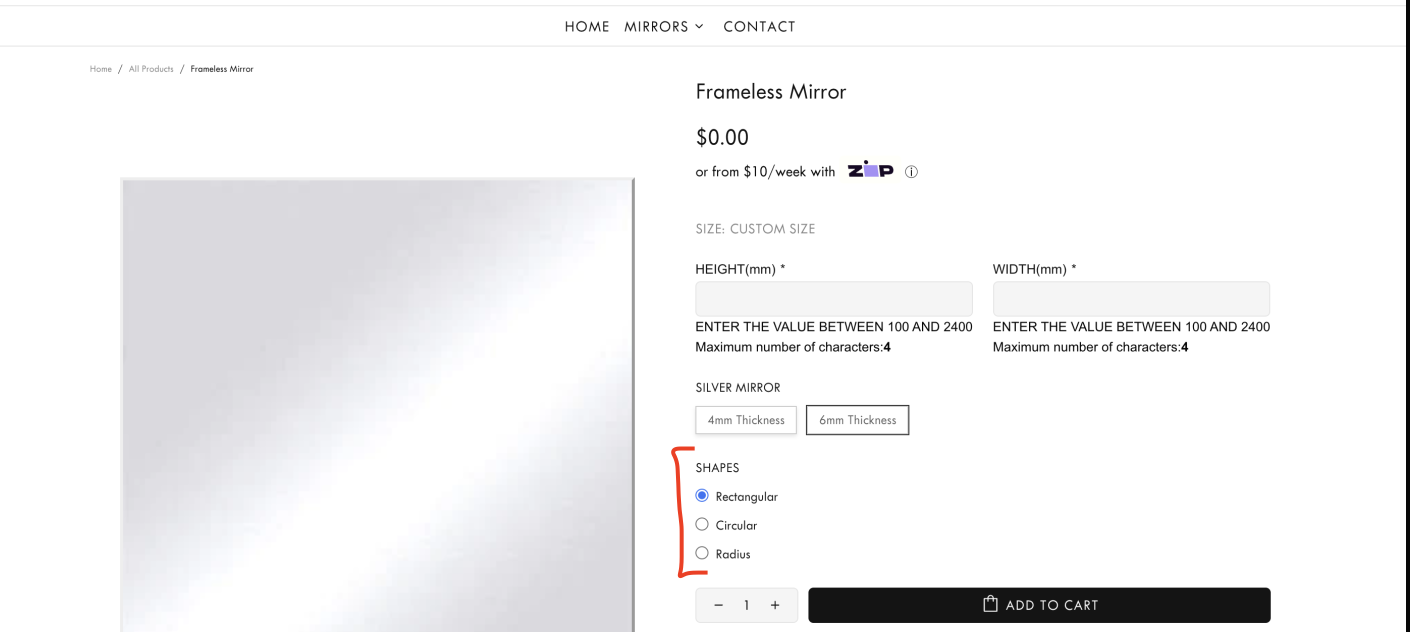
- Check the entry below to ensure that both variants (Rectangular and Circular) are listed correctly.
- To add a third label, enter “Radius” in the “Enter label” text box.
- Choose “Frameless Mirror Collection” as the category for the variant.
- Click the “Save” button.
- Check the entry below to ensure that all three variants (Rectangular, Circular, and Radius) are listed correctly.

- You can preview it on a website.
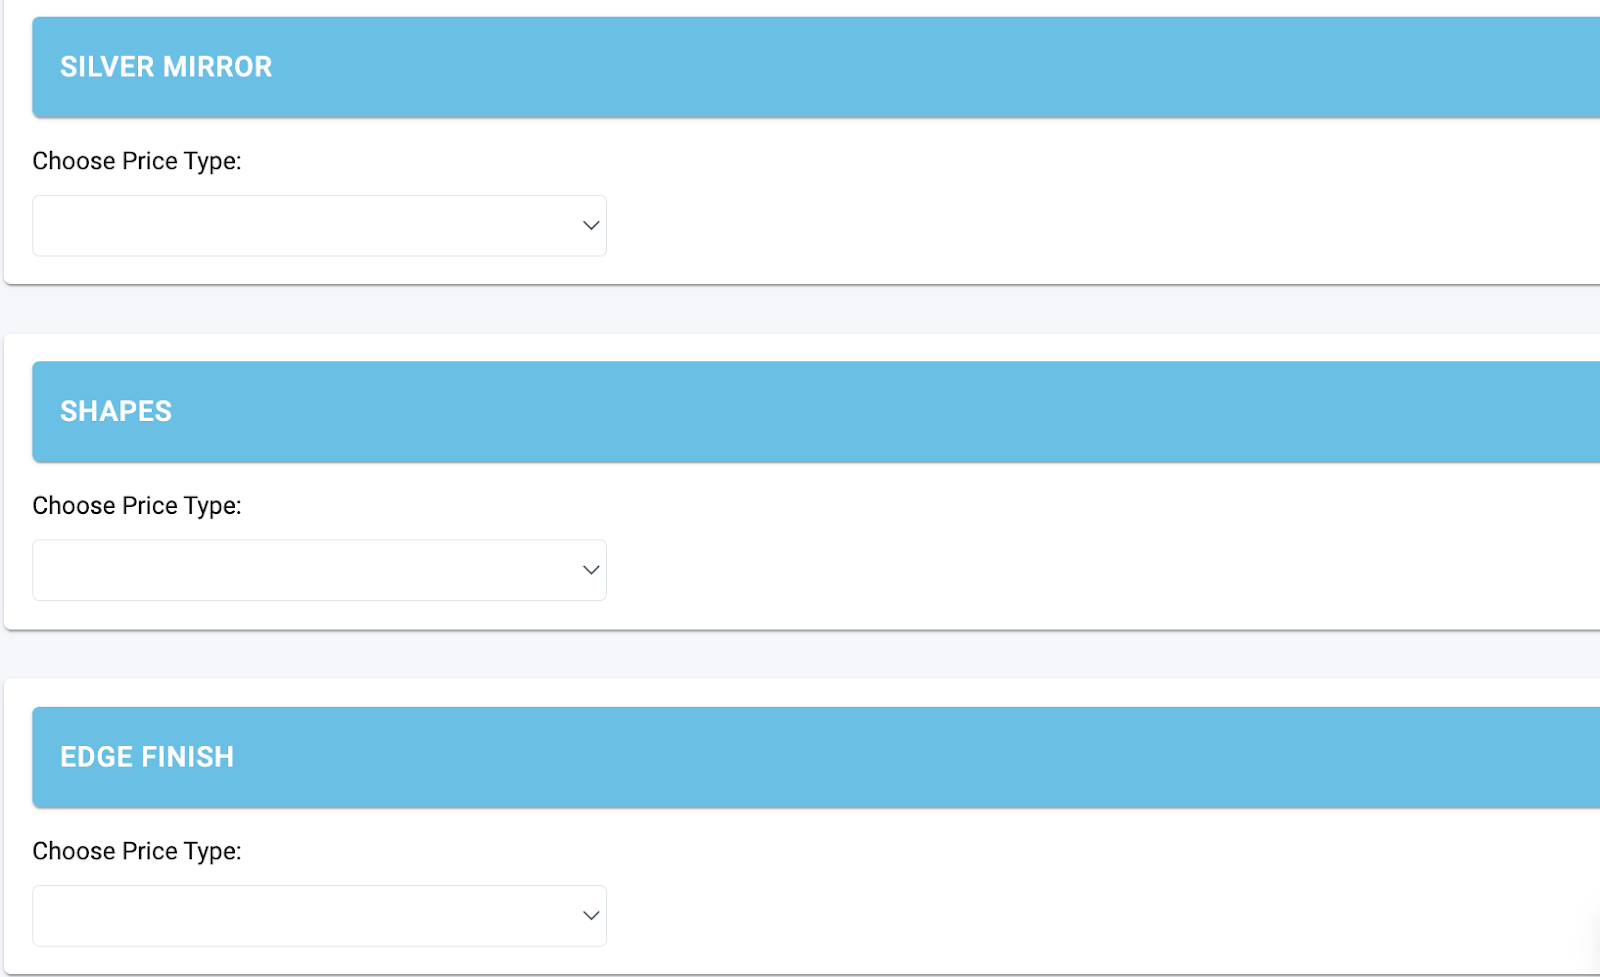
Pricing configuration:
1. Go to the LIVEVUE section, Click on the “Pricing calculation” option.
2. In this section, you can see the added variants (SILVER MIRROR, SHAPES..)
3. Configuring Pricing for SILVER MIRROR:
- In the “Choose Price Type” dropdown list, select the “custom” option.
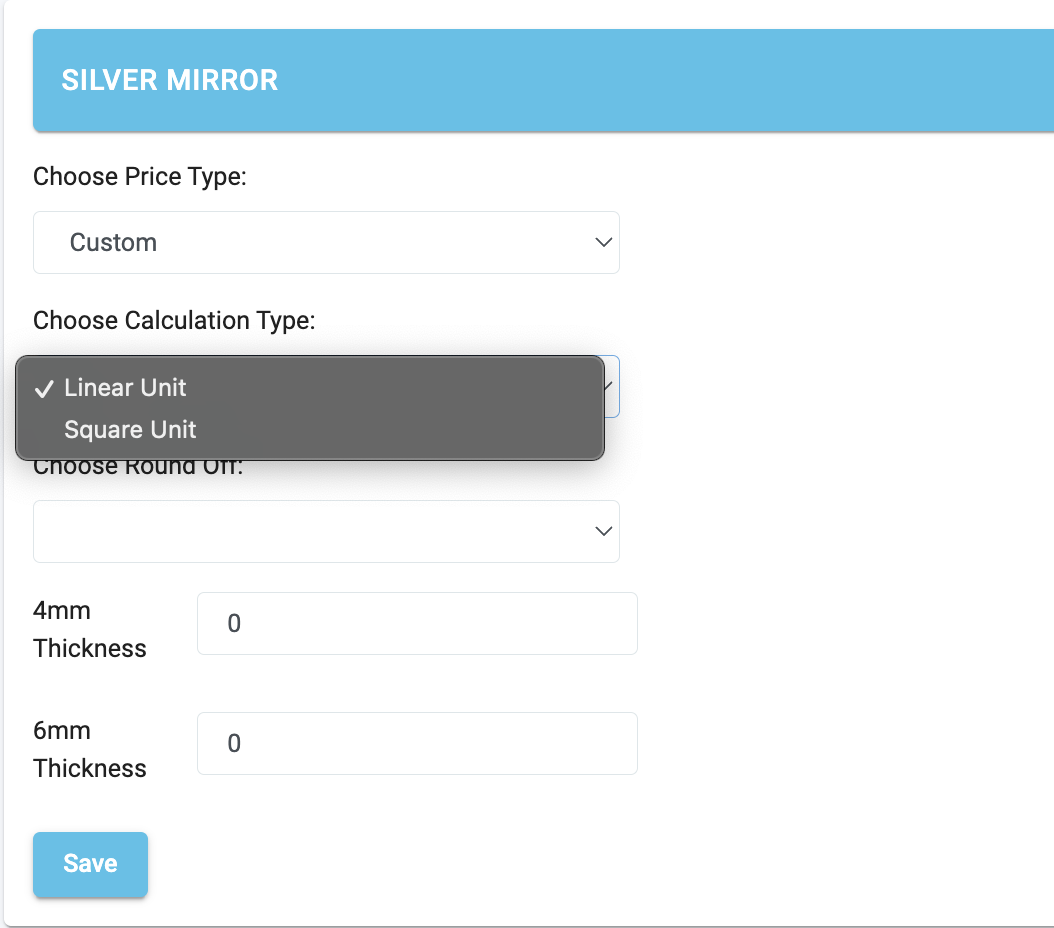
- In the “Choose Calculation Type” dropdown box, there are two options: ‘Linear Unit’ and ‘Square Unit’. If you need to calculate the area, choose the ‘Square Unit’ option. If you need to calculate the perimeter, choose the ‘Linear Unit’ option.

- If you’re using a custom formula for pricing which is calculated on the backend code, there’s no need to choose any option in the “Choose Calculation Type” dropdown box.
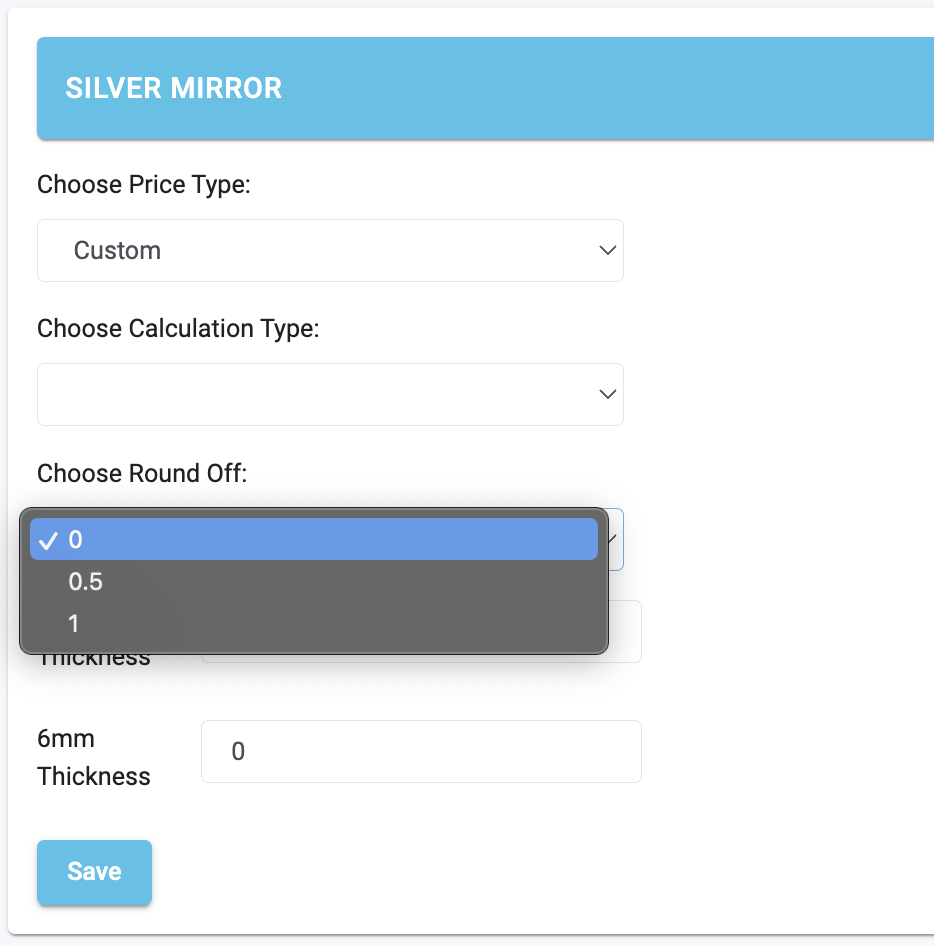
- In the ‘Choose Round Off’ dropdown box, you can select the rounding value. It can be 0, 0.5, or 1.
- There’s no need to select any option in the “Choose Round Off” dropdown box, as the round-off values are calculated based on your formula on the backend code.
- The input price value for the different thickness options in the Customer Input Msft Excel / Google Spreadsheet:

- In the corresponding text field for the “4mm Thickness” option, enter the price value of 54.45.
- In the corresponding text field for the “6mm Thickness” option, enter the price value of 60.50.
- Click the “Save” button.
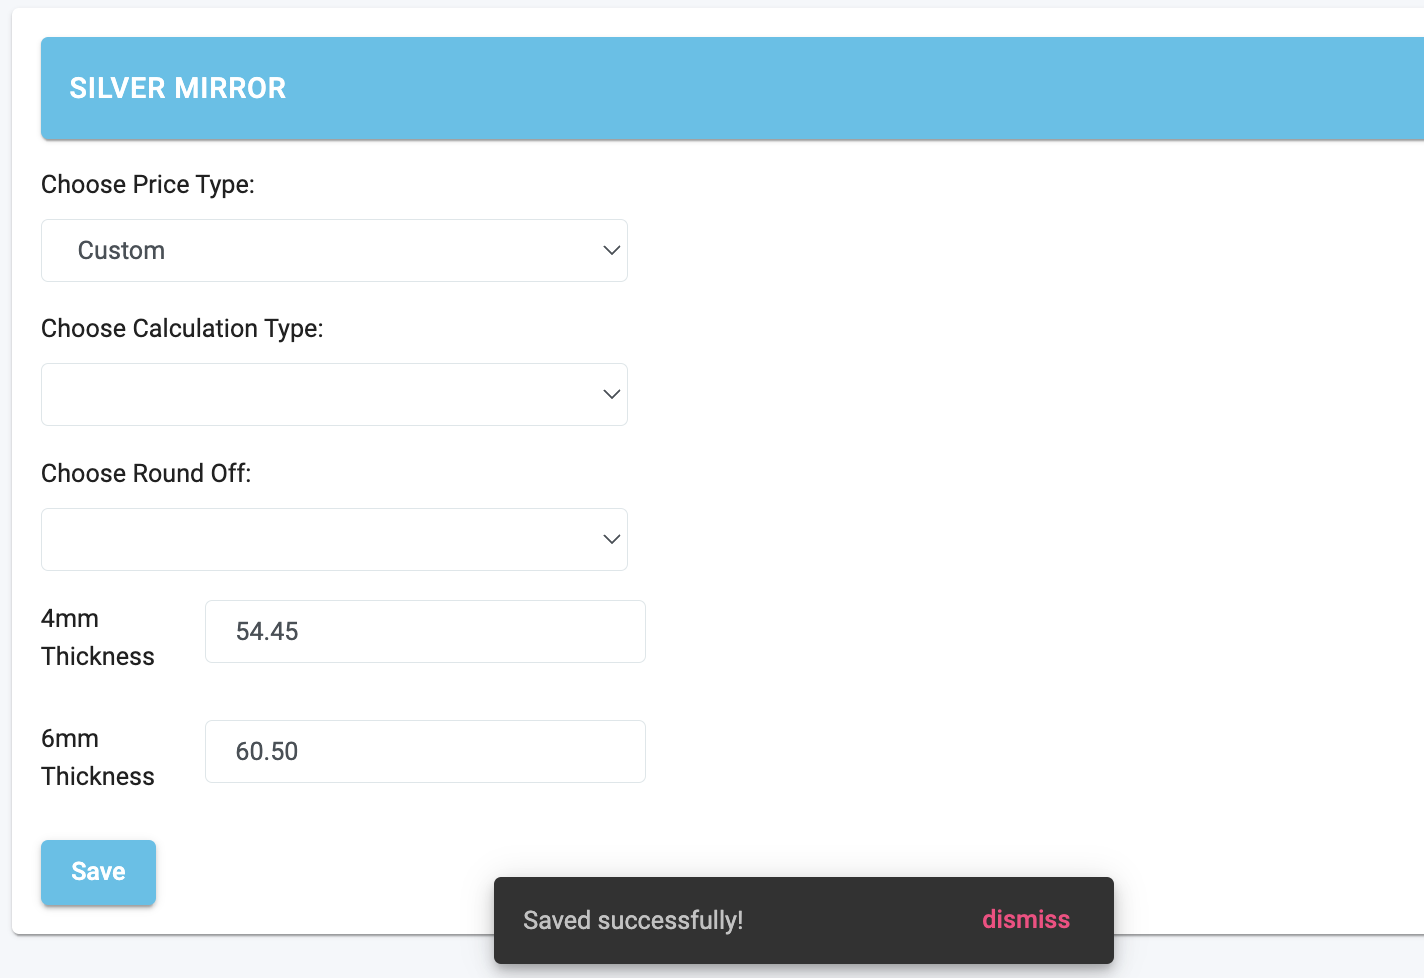
- The input price value is calculated based on a custom formula that is coded on the backend. When you click on the options, this formula calculates the expected result, which is then displayed on the website.
One of our customers use this type of “LIVEARf App Only Use Cases Flow“: Mirror City
